Aakaar, IIT Bombay 2019 is bringing you the new series of Akshar blog very soon.This is the 11th edition of Aakaar, IIT Bombay.The first blog will be released in the next week i.e 20-26th of August.Stay Tuned!!
Blog – 3D printed buildings
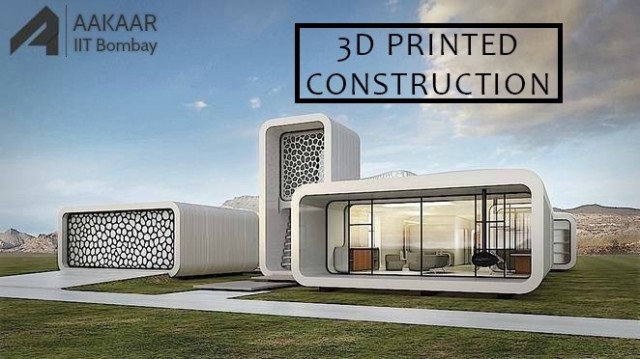 Introduction
Architecture has a habit of adapting its aesthetics to new technologies, whether consciously or unconsciously. Some of the most beautiful buildings of the Industrial Revolution – the cantilever Forth Bridge, for example – were designed by engineers, not architects, for example. Architecture quickly absorbed the idea of buildings that reflected their purpose.
3D printing is the process of making physical models from three dimensional digital models. 3D printing has been around since the 1980s but at that time was a difficult and expensive operation and so had few applications. It is only since 2000 that it has become relatively straightforward and affordable and so has become viable for a wide range of uses such as; product design, component and tool manufacture, consumer electronics, plastics, metalworking, aerospace engineering, dental and medical applications, footwear and so on.
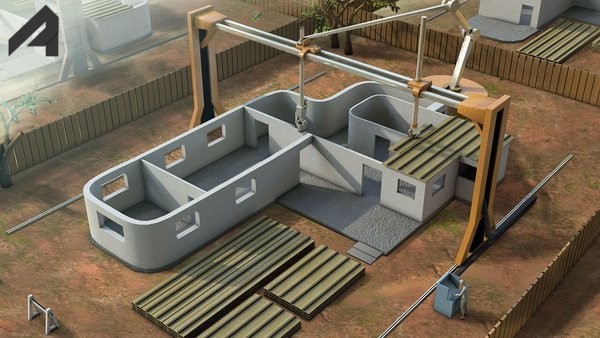
Construction 3D Printing refers to various technologies that use 3D printing as a core method to fabricate buildings or construction components. The term was first coined by James B Gardiner in 2011.
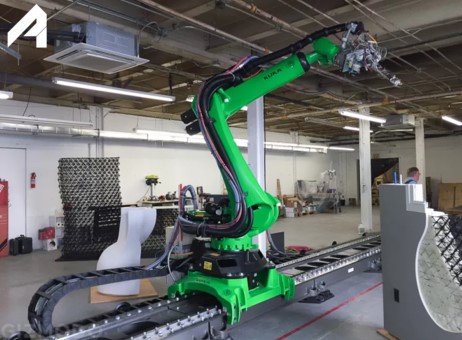
 3D Printing Arm
Construction Industry
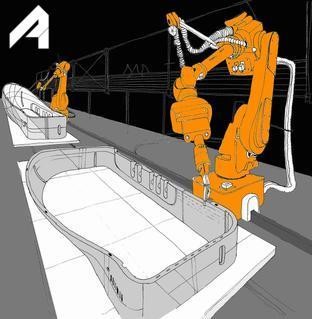
In construction field, 3D printing is used to fabricate building or construction components. These components are then assembled and used in construction field.There are a variety of 3D printing methods used at construction scale, these include the following main methods: extrusion, powder bonding and additive welding. 3D printing at a construction scale will have a wide variety of applications within the private, commercial, industrial and public sectors.
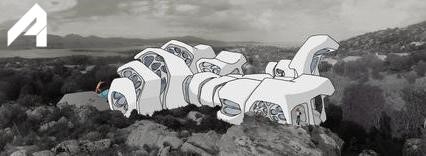
But conventional buildings are not made by extrusion or casting or any other single manufacturing process; they are accretions of dozens of different techniques from cast-and-pour concrete to spot-welded steel extrusions to laminated glass. How could one process replace the dozens of others that we currently use? Yes, that is part of 3D printing’s promise — that it’s versatile enough to do the work of multiple machines — but current printed buildings are either minimally functional, if gorgeous, pavilions or houses that are basically dumb printed boxes with traditional bric-a-brac tacked on.
Designing
Architect James Bruce Gardiner pioneered architectural design for Construction 3D Printing with two projects. The first Freefab Tower 2004 and the second Villa Roccia 2009-2010. FreeFAB Tower was based on the original concept to combine a hybrid form of construction 3D printing with modular construction. This was the first architectural design for a building focused on the use of Construction 3D Printing. The focus of the project was to explore how 3D printing could provide a silver bullet to off-site construction – by providing a direct means of fabricating 3D printed monocoque modules, simplifying the construction process.The FreeFAB Tower project also depicts the first speculative use of multi-axis robotic arms in construction 3D printing.
 FreeFAB tower
The Villa Roccia 2009-2010 took this pioneering work a step further with the a design for a Villa at Porto Rotondo, Sardinia, Italy. The design for the Villa focused on the development of a site specific architectural language influenced by the rock formations on the site and along the coast of Sardinia, while also taking into account the use of a panellised prefabricated 3D printing process. The project went through two stages of development beyond the original concept design, the first focused on the design and fabrication of a column. The second design stage was focused on detailed design/documentation of a segment of the house. The second stage of prototyping was only partially completed and the project didn’t proceed to full construction.
 Proposed design concept for Villa Roccia
Ongoing and Completed 3D printing projects:
3D printing technology promises to revolutionize architecture in the near-future, allowing designers to literally click-and-print complex buildings at a lower cost and faster speed than traditional construction methods allow. Here is a list of all ongoing and completed projects in field of 3D printing:
- San Francisco-based 3D-printing startup, Apis Cor, recently showed it can 3D-print concrete walls for a small house in less than 24 hours. Using a 3D-printer to lay down concrete walls on a test site in Russia, the firm was able to “print” a 400 sq ft house. The printer, which resembles a small crane, places layers of a concrete mixture the company claims can last for 175 years and after the walls have been laid, the printer is removed and insulation, windows, appliances and a roof is added. The company claims these houses could be used to help quickly re-house people affected by natural disasters, or in areas of extreme housing crises.
- Another step forward in the field comes via Dubai, where what’s hailed as the world’s first 3D-printed office was recently completed. It took 17 days to print the basic building, but it then required finishing both internally and externally.
 World’s first 3D printed office in Dubai.
- NASA and the European Space Agency have some of the most ambitious plans of all: printing on the moon! And Mars! NASA is currently in the second round of an architectural competition to design a Martian colony, building on the first round where the winner proposed a dome printed out of Martian ice. The advantages here are clear: Rather than having to transport construction materials from Earth, printed buildings could use local materials as their substrate. All that would have to be transported would be the printing apparatus, which is a big saver when you consider how much of a headache it is to move stuff between planets.
- In March of last year, company WinSun claimed to have printed 10 houses in 24 hours, using a proprietary 3D printer that uses a mixture of ground construction and industrial waste, such as glass and tailings, around a base of quick-drying cement mixed with a special hardening agent.
 World’s Largest free form 3D printer and the wall that it printed.
Future Benefits of 3D printing in Construction Industry
Since its advent, 3D printing has been on a steady path forward. And the further along it moves, the more people have been wondering how it will affect and benefit all industries. Here are some possible future benefits of 3D printing in construction:
- New Shapes and Design Possibilities: 3D printers allow an architect to be totally flexible in the shape of his designs. 3D printing can build curvilinear structures.Using a concrete and composite mixture, 3D printers can build these curvilinear structures, which offer the strongest structural design, especially compared to the limits of rectangular forms.
- Lower Costs: Costs could be lowered on both a large structure scale and with regard to parts. On a large scale, 3D printed buildings would have potential for far lower materials costs and labor. This could be especially applicable and helpful in 3rd world countries, where better homes could be built for less.
- Remote Location Construction: And in a totally bizarre and out-of-this-world use of 3D printing, the European Space Agency is considering building a 3D printed lunar village on the moon using lunar soil. And it proves that 3D printing could take us anywhere—there is no application too wild.
- More Precise Building: According the managing director of Facit Homes, which is building a 3D Printed Home in London, a 3D Printed home has better and more precise results because a file is passed from a computer to a machine, and is never touched by human hands, so it is never up to interpretation. The file translates directly to an object.
Disadvantages of 3D Printing:
- Cost of Buying and Setting up A 3D Printer Is Very High: The biggest of the disadvantages of 3D printing is the cost factor. While it is true that over its whole life a 3D printer ends up paying for itself more than once, the initial cost still remains something of a roadblock for most businesses and individuals. For instance, top end 3D printing devices or additive manufacturing machines can end up costing anything between $300,000 and $2 million. Furthermore, even the consumables can end up costing a pretty penny with prices ranging from $100 to $200 for every pound consumed.
- 3D Printed Objects May Require Heavy Duty Post Processing: When it comes to the disadvantages of 3D printing, one that anyone who has seen 3D printing live can spot is the poor finishing quality of the object printed. The quality of the finish can leave a lot to be desired in a 3D printed object. Moreover, it isn’t only the lack of polish that is the problem but also the possible dimensional inaccuracy.
- Significant Job Loss: Every invention is designed to solve a problem or make a particular task easier. Since that problem or that task was earlier performed by an individual, it can be said that every new invention ends up taking away jobs amongst the masses.This is something that has been seen throughout history, during Industrial Revolution, Digital Revolution, and also when industries tried to automate. However, disadvantage is something of a non – starter because new technologies almost always end up generating newer jobs. People just have to adapt and acquire new skills to be qualified for those new jobs.
As 3D Printing use in the Construction Industry is in its early stages, it is still too early to tell what will happen. But it’s exciting to watch the change and imagine the future possibilities!
Sources:
- https://en.wikipedia.org/w/index.php?curid=53257490
- https://en.wikipedia.org/w/index.php?curid=53257331
- http://www.wired.co.uk/article/architecture-and-3d-printing
- https://en.wikipedia.org/wiki/Construction_3D_printing
- https://www.cnet.com/news/worlds-first-3d-printed-apartment-building-constructed-in-china/
- http://www.gensleron.com/work/2016/5/31/the-future-has-arrived-worlds-first-3d-printed-office-is-ina.html
- http://www.fybmarketing.com/2016/08/
- http://www.lampinc.net/what-are-the-future-benefits-for-3d-printing-in-the-construction-industry/
- http://blog.inkjetwholesale.com.au/3d-printing/disadvantages-3d-printing/
- http://gizmodo.com/the-world-s-biggest-free-form-3d-printer-is-being-used-1720867145
- https://www.forumhouse.ru/articles/other/5278
- http://www.architectmagazine.com/technology/meet-the-future-of-3d-printed-buildings_o
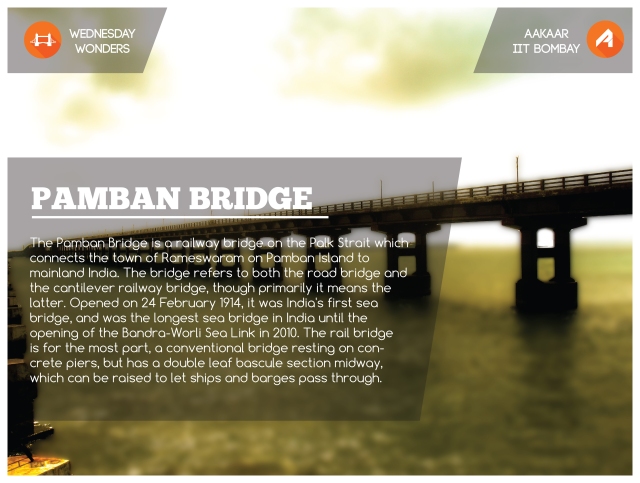
WEDNESDAY WONDERS #5
PAMBAN BRIDGE
The Indian peninsula is connected with Rameswaram Island through a road and a railway bridge, these two bridges are commonly referred to as Pamban Bridge.
The Rail bridge:
Pamban railway bridge is the first Indian bridge which is built across the sea. It is generally referred as The queen of Indian bridges. The idea to build a bridge across Pamban channel (Palk strait) was proposed in around 1870’s by the British government. However, the construction of Pamban bridge commenced only in 1911 and was commissioned in 1914.
The following Table depicts the short historical notes on Train service to Rameswaram island
| 1902 | Train service started from Madurai – Mandapam |
| 1906 | Railway Tracks laid between Pamban and Rameswaram |
| 1908 | Train service started between Pamban and Rameswaram |
| 1911 | The cantilever Rail bridge across the sea was commenced |
| 1914 | The Pamban Rail bridge has been completed and train service started |
Until 1988, Pamban rail bridge was the only connecting path between Rameswaram and the mainland of India.
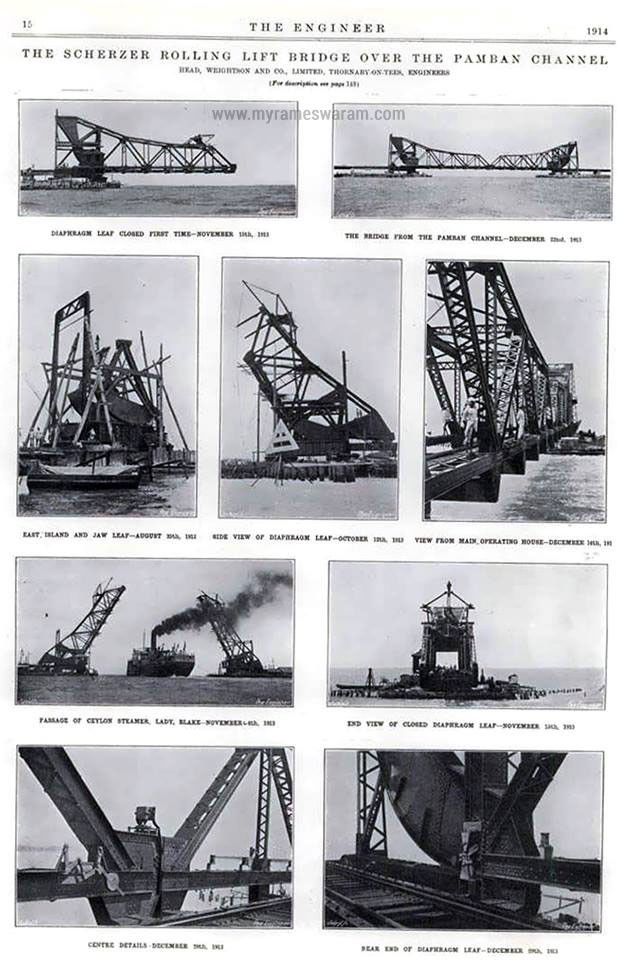
This bridge started its service of connecting Rameswaram island from February 24, 1914. Being a cantilever bridge, it has two arms fitted to the piers extending from either side and meeting at the center without supports.
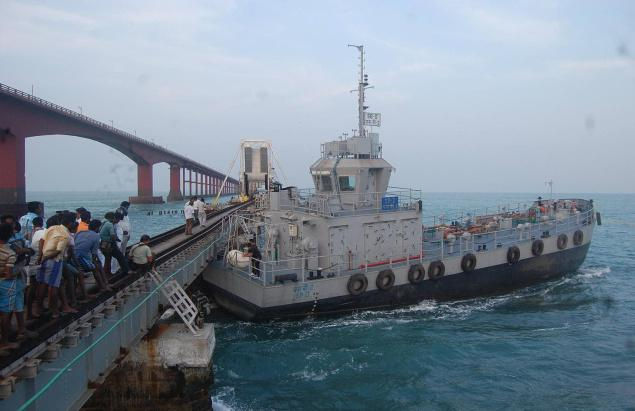
The bridge, as a whole, spans a length of 6776 feet (2.065 meters) and has 143 piers. In the center of the bridge, there is a double leaf bascule section which opens up and let the ships and boats to cross. Based on the records, an average of 10 to 15 ships (coast guard boats, cargo ships, container ships etc.) passes beneath this bridge every month. The bascule was designed by Scherzer, a German engineer. In his honour, the bascule part of the bridge is called as “Scherzer rolling type lift span”. Boasting a length of 220 feet and weight of 200 tonnes (each leaf weighs 100 tonnes separately), these heavyweight leaves are lifted manually by workers by operating levers on either side.
Cyclone Attack:
On December 23, 1964, a super cyclonic storm struck the Pamban bridge bearing winds of velocity about 240 Km/hour. It swept away the entire region of Dhanuskodi and upturned the Pamban – Dhanuskodi Train with 150 passengers. Part of the Pamban Railway bridge was shattered and broken owing to the catastrophe.
The Indian Railway upgraded this bridge to broad gauge on August 12,2007.
The 100-year-old queen – UNESCO’s heritage status
The 100th year celebrations of the Pamban rail bridge were held in 2014. It was also nominated for UNESCO’s heritage status in 2013 by the Indian Railways Department.
Crossing numerous catastrophic events, accidents, flowing tides for a hundred years, the Queen of Indian bridges – The Pamban Bridge stands with an everlasting smile in the Palk strait as a gigantic engineering marvel.
Astonishing Facts about Pamban Rail bridge
- Second Longest sea bridge in India ( first longest till the opening of Bandra Worli – sea link Mumbai on 2009).
- The location of this bridge is world’s second highly corrosive environment next to Miami, US.
- It is also Cyclone prone and high-velocity wind zone.
- The two hundred tonne bascule leaves are still operated manually by the workers .
- This Rail bridge was shattered during the cyclone on December 26, 1964.
- After the cyclone, the Indian railway set a plan to repair the Pamban bridge , targeted in 6 months.
- The bridge was renovated and restored again in just 46 days under the leadership of I.E.S officer E. Sreedharan renowned as Metro man.
Detailed facts and figures of the Pamban Rail Bridge are stated below:
- Length – 2.06 KM
- Number Of piers – 143
- Structural Design – Cantilever – Bascule Bridge
- Railway track – Broad Gauge
- Crosses – Palk Strait
- Connecting Railway stations – Mandapam – Pamban
- Location – 9°16´56.70´´N 79°11´20.12´´ E / 9.2824167° N 79.1889222° E
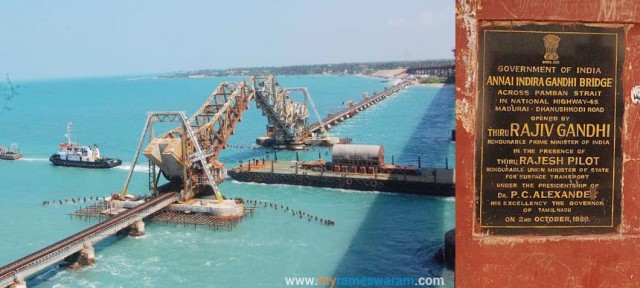
Pamban Road Bridge: Annai Indira Gandhi Bridge
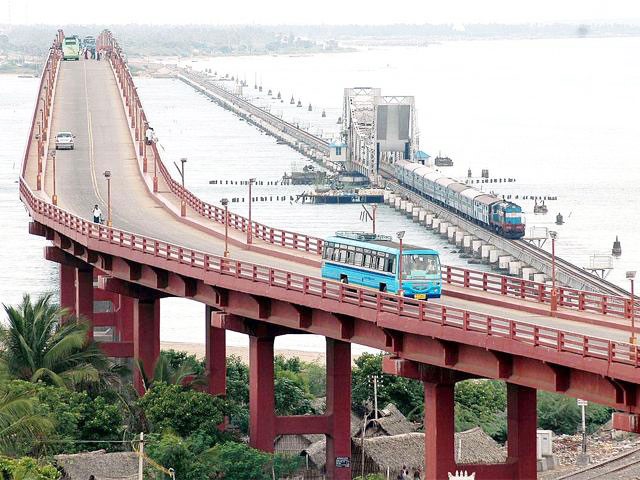
The Pamban Road Bridge connects the National Highway (NH 49) with the Rameswaram island. It stands on the Palk strait and between the shores of Mandapam (place on the Indian mainland) and Pamban (a fishermen town in Rameswaram island) standing parallel to the Pamban Rail Bridge.
Quick History of Pamban Road Bridge
After the cyclone of 1964, a plan for a road bridge parallel to the existing railway bridge was proposed by the Tamil Nadu Government. But it was denied and dropped by the Indian Railway Ministry. Many years later, the construction works of Pamban Road bridge commenced on 17-11-1974 by the Indian Highway department. The cost for its construction was estimated to be a whopping 537.57 Lakhs at that time and contracted to M/S Neelakandan Brothers Engs , Madras .
Hit by a cyclone once again in 1978, the work was carried out slowly following that. After a few more years, the construction work contract was handed over to the New Gammon India Ltd., Government of India revised and sanctioned the contract amount to be 16.6514 crore INR by 1986. The work was completed finally in 1988. It took 14 years to complete this engineering marvel. This Road Bridge was named as ANNAI INDIRA GANDHI ROAD BRIDGE and inaugurated by the then Indian Prime Minister Rajiv Gandhi on the date of October 2, 1988.
Renovation Works:
Standing in the world’s second most corrosive environment and a high cyclone prone zone, it was proposed that anti-corrosive coatings should be applied every 5 years. On January 2013, the Union Ministry of Road Transport and Highways sanctioned Rs.18.57 crores to renovate the existing bridge. Sources said that the piers were painted with coal tar epoxy, and the non-splash zone with epoxy primer. The 592 old bearings were replaced and the electrical cables and the lamp posts were repaired.
Architecture of Pamban Bridge:
Unlike the Pamban Rail Bridge, the road bridge does not have any bascule structure to provide a passage through the sea. The arch-shaped architecture of the bridge and its height from the sea level let the ships and boats pass beneath it without any disturbance. Detailed facts and figures of the Pamban Road Bridge are stated below :
| Opened on | 1988, 2nd October |
| The structural Design | Arch Bridge |
| The Length of the Pamban Road Bridge | 2.345 KM |
| The Total Number Of Pillars (Piers) holding the Bridge | 79 Pillars |
| Number of Pillars (Piers) Stands inside the Sea | 64 pillars |
| The Maximum Height of the Bridge from the sea level | 17.68 M |
| The Number of Electrical Lamp posts on the bridge | 174 Lamp Poles |
| Connecting Places | Mandapam and Pamban |
| Lane | Two lane |
| Region | Over the Palk strait |
| Location | 2824167° N 79.1889222° E |
The ship that was towing the naval barge from Kolkata to a port near Mumbai first went aground hitting rocks on January 10th, 2013 following the bad weather. It was a disaster waiting to happen as the vessel remained stuck just 50 metres away from the rail bridge. The barge that was afloat around 100 metres away hit the Pamban Rail Bridge on 13th January causing substantial damages to the structure of the bridge.
To view the working of bascule part, it is suggested to watch – https://www.youtube.com/watch?v=GH2lCZzIhFY
WEDNESDAY WONDERS#4
LEH MANALI HIGHWAY
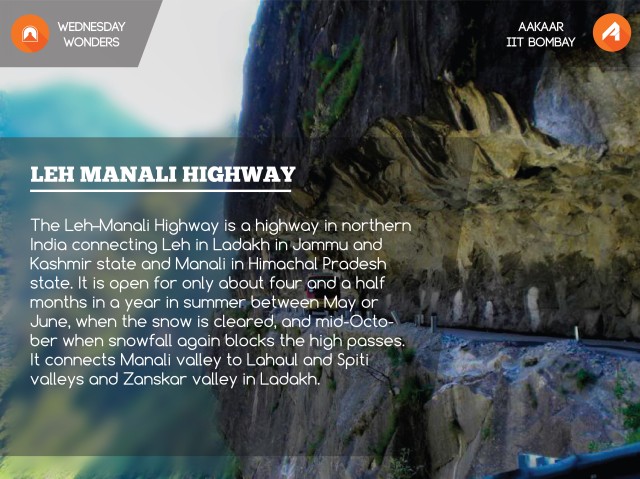
The Leh-Manali Highway is a high mountain road situated in India. It spans over a length of 479 km (298 mi) among the Himalayan mountain range. It passes through some of the world’s highest mountain passes in the world, with a mean altitude in between 2 to 3 miles above sea level.Uncertain weather, high altitude, no roads, extreme cold and no civilization for miles make this a very treacherous track.
This dirt gravel road connects Leh in Ladakh in Jammu and Kashmir state and Manali in Himachal Pradesh state. The journey from Manali to Leh takes about one full day by jeep or two days by bus. It’s accessible for cars and trucks during several months in summer only and its highest elevation is 5,328 m (17,480 ft) at Tanglang La mountain pass. Because of the important position of Ladakh between China and Pakistan this Highway plays an important strategic role for India, which results in the maintenance of the road by the Indian army itself. In addition to the spectacular landscape the life on and next to the road is diversified because of a wide variety of people frequenting it. Construction workers from other parts of India are working for better road conditions during the summer.
This road is usually open for only about four and a half months in a year in summer between May or June, when the snow is cleared by the Border Roads Organisation (BRO) of Indian army, and mid-October when snowfall again blocks it. Avalanches and heavy snowfalls can sometimes block some sections of the road and can be extremely dangerous due to frequent patches of ice. Conditions can change quickly and be harsh. Road closures can be frequent, so check conditions before traveling to this area. Tourists from all over the world, as well as a growing number of Indian tourists use this road for the scenic impressions of the mountains. Truck drivers transport their cargo to Leh and back to other parts of India.
Road sign give advance information about road conditions ahead but on this highway you can see totally different road sign which not only tells about road condition and also tells you that how precious your life is.


Leh is set to become an all-weather destination after completion of an 8.8 km-long tunnel highest in the country at an altitude of 10,000 metres to bypass the formidable Rohtang Pass.
The Rs 1,410-crore project, which is under way to connect Lahaul valley and make Leh accessible throughout the year, has many firsts. Work is on to make the country’s first snow gallery to protect the tunnel from avalanches that are a major threat to infrastructure.
“There are 40 avalanche sites en route the tunnel. The snow gallery will reduce the risk to a more manageable 18,” said Col R K Patial, officiating chief engineer, Border Roads Organisation (BRO), Shimla.
Modelled on snow galleries in the Alps, Switzerland, the gallery is a concrete conduit built as a roof to protect the road beneath it from avalanches which would pass over it.
“A snow gallery in the Himalayas is much more challenging than those in the Alps because of the sheer attitudes and difficult terrain,” said D N Sethi, joint director, Snow and Avalanche Study Centre, Chandigarh.
The horseshoe-shaped tunnel will reduce the distance from Manali to Leh by 46 km, besides making it an all-weather route. At present crossing Rohtang Pass is the only way to approach Lahaul valley which remains closed for nearly five months after the season’s first snowfall around November.
The mouth of the tunnel is 16 kms from Manali on the Rohtang route, while the other end will hit Nimu. The Central government is spending Rs 286 crore on making a double lane approach road to Leh from Nimu and Rs 180 crore on a similar road from Manali.
It is capable of supporting the heaviest of army vehicles.
Geographical features
It is flanked by mountain ranges on both sides featuring some stunning sand and rock natural formations.The highway crosses many small streams of ice-cold water from snow-capped mountains and glacial melts without a bridge and it requires driving skill to negotiate fast-flowing streams. The landscape changes immediately after getting past Rohtang Pass and entering into Chandra river valley in Lahaul region that lies in rain-shadow. The greenery on the southern side of the mountain pass disappears and the mountain slopes on the leeward side become brown and arid. However, the mountain peaks are covered in snow and shine brightly in sun.
Leh-Manali highway is generally two lanes wide (one lane in either direction) without a road-divider but has only one or one and a half lanes at some stretches. It has over a dozen bailey-bridges and most of them are in dilapidated condition. The highway has many damaged stretches and under-maintenance portions where even a little rainfall can trigger landslide making it very dangerous to cross that stretch of the road. The riding quality is not good at many places and fast speeds can cause discomfort.
Length of highway
The total length of the highway is about 490 km (300 mi). The distance in Himachal Pradesh state between Manali and Sarchu is 230 km (140 mi)and the distance in Ladakh region from Sarchu to Leh is 260 km (160 mi).
At Sarchu, Lahaul region ends at the Himachal Pradesh state border and Zanskar region starts in Ladakh region of Jammu and Kashmir state.
Route
Manali-Rohtang Jot – Gramphu – Kokhsar – Tandi – Keylong – Jispa – Darcha – Zingzingbar – Baralacha La – Bharatpur – Sarchu (state border) – Gata Loops – Nakee La -Lachulung La – Pang – More Plains – Tanglang La – Gya – Upshi – Karu – Leh
Distances
- Manali (altitude 1,950 m (6,400 ft)) to Marhi at 3,300 m (10,800 ft) elevation 33 km (21 mi). It is a steady climb.
- Marhi to Rohtang pass at 3,980 m (13,060 ft) elevation 18 km (11 mi). It is a steady climb.
- Rohtang to Gramphu at 3,200 m (10,500 ft) elevation 19 km (12 mi). It is a steady descent. Turn left (towards west) at Gramphu on the highway along Chandra river. The right turn (towards east) at Gramphu leads to Spiti valley and Batal, Kunzum La and Kaza on a road along Chandra river that is paved for some distance and then unpaved.
- Gramphu to Kokhsar, the first village north of Rohtang Pass 6 km (3.7 mi). Foreign nationals have to show their passports with valid visa at the police check post here. (Anyone can visit Leh freely. However, special permission is needed to visit some restricted areas beyond Leh. This permit can be obtained at Leh.)
- Kokhsar to Sissu at 3,130 m (10,270 ft) elevation 25 km (16 mi). There is a helipad at Sissu. The highway runs along left (south) bank of Chandra River.
- Sissu to Tandi at 2,570 m (8,430 ft) elevation 8 km (5.0 mi). Tandi is situated at the bottom of the river valley at the confluence of the Chandra river and the Bhaga river (flowing down from north) which merge to form the Chandra-Bhaga river (that later becomes known as Chenab downstream in Jammu and Kashmir). Cross the Bhaga river over the bridge towards the right, take the right turn at the fork and the road again starts climbing.
- Tandi to Keylong at 3,080 m (10,100 ft) elevation 9 km (5.6 mi).
- Keylong to Jispa at 3,310 m (10,860 ft) elevation 22 km (14 mi).
- Jispa to Darcha at 3,360 m (11,020 ft) elevation 6 km (3.7 mi). All tourists have to register at the police check post here.
- Darcha to Zingzingbar 4,270 m (14,010 ft) elevation 26 km (16 mi). The steep ascent to Baralacha La starts at Zingzingbar.
- Zingzingbar to Baralacha La pass at 5,030 m (16,500 ft) elevation 18 km (11 mi). It is a steady climb. (Both the Bhaga river and the Chandra river originate from melting snow at opposite sides of Baralacha La, the former flowing southwest and the latter flowing first southeast and then northwest to merge at Tandi.)
- Baralacha La to Bharatpur 2 km (1.2 mi). It is a steady descent.
- Bharatpur to Sarchu at 4,300 m (14,100 ft) elevation 38 km (24 mi). Sarchu is a military base and has a police check post. Register at the police check post here. (Himachal Pradesh state ends here. Ladakh region of Jammu and Kashmir state starts here.)
- Sarchu to Pang 4,600 m (15,100 ft) elevation 80 km (50 mi) climbing 500 m through the Gata loops (22 hairpin bends) at 4,190 m (13,750 ft) elevation and traversing through Nakee La pass at 4,739 m (15,547 ft) and Lachulung La pass at 5,065 m (16,616 ft) elevations. Register at the check post at Pang.
- Pang to Tanglang La pass at 5,328 metres (17,480 ft) elevation, 69 km (43 mi) through a 4,700 m (15,400 ft) plateau called More plains or Morey plains.
- Tanglang La pass to Upshi 60 km (37 mi). Upshi has a Customs and Excise taxation check post before crossing the river. Stop here for checking of vehicles. Then cross Indus river to reach Upshi village on the right bank (north) of the river. An ancient trading road (right turn while coming from Manali and going to Leh) heads to the east from Upshi towards Tibet. There is a helipad on this road.
- Upshi to Karu 16 km (9.9 mi) After crossing Indus river, the highway is on the right bank (north) of the river from Upshi to Leh. Turn left at Upshi for Karu. Do not take the right turn that leads to the east towards Tibet.
- Karu to Leh at 3,500 metres (11,483 ft) elevation, 35 km (22 mi) Continue on the highway towards Leh. Do not take the right turn just before Karu that leads to Shyok.
The distance from Lachalang La pass to the Tanglang La pass is 87 km (54 mi) via Pang.
Altitude sickness
Owing to the rarefied atmosphere (low air pressure) at high altitude, less oxygen is breathed in and many travellers experience altitude sickness or acute mountain sickness. Before beginning the journey on the highway towards Leh, it is advisable to stay at the starting point Manali (altitude 1,950 m (6,400 ft)) one night and minimum one night at either Keylong, Jispa or Darcha to cope with the high passes and plains after Darcha. It is strongly advised not to sleep in Sarchu or Pang on the upward journey (towards Leh) as it can cause acute mountain sickness : headache, nausea, dizziness and vomiting. There have been deaths from AMS as well. The safe option is to camp at Leh or higher altitude after getting acclimated to lower oxygen levels. It is also advisable to carry chocolates, glucose or other high energy food on the journey and spend only a little time at the high mountain passes.
Climate along the highway
Ladakh is a cold semi-arid desert. It is cold along the highway even in summer (June onwards); the days are warm in bright sunshine but the nights are very cold. The water from glacial melts is ice-cold and one should avoid getting wet in water-crossings on the highway. Light woollens are required during the day and thick woollens at night. There is no rainfall between Rohtang pass and Leh even during the monsoon season in July–September as the entire region lies in rain-shadow. The greenery on the southern side of Rohtang disappears and the mountain slopes on the northern side become brown and arid. However, the mountain peaks are covered in snow and glare brightly in sun.
TEHRI DAM
TEHRI DAM
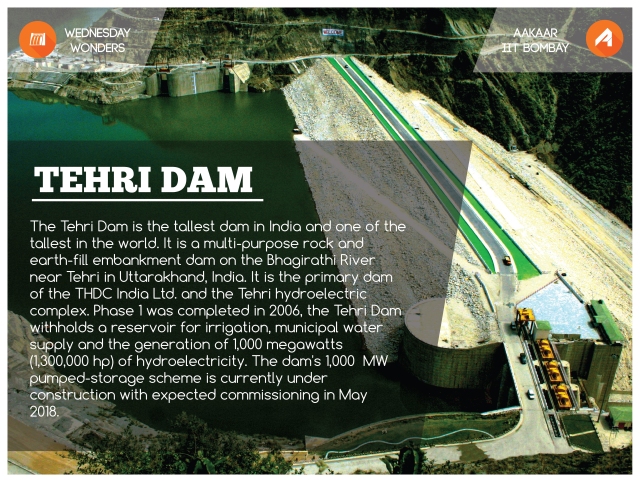
The Tehri Dam is the tallest dam in India, 2nd highest in Asia and 8th tallest in the world. It is a multi-purpose rock and earth-fill embankment dam on the Bhagirathi river near Tehri in Uttarakhand, India. It is the primary dam of the THDC India Ltd. and the Tehri hydro-electric complex. Phase 1 was completed in 2006, the Tehri Dam withholds a reservoir for irrigation, municipal water supply and the generation of 1,000 megawatts (1,300,000 hp) of hydroelectricity. The dam’s 1,000 MW pumped storage scheme is currently under construction with expected commissioning in May 2018.
This mega project of 2000 MW installed capacity, envisaged construction in two stages. The stage‐I, is termed as Hydropower Plant (HPP) and Stage‐II comprising a Pump Storage Plant (PSP), have an installed capacity of 1000 MW each. From inception to the year 1988, the project was executed by Irrigation Department of Uttar Pradesh and afterwards by Tehri Hydro Development Corpn. Ltd. (THDC).
The Tehri Dam withholds a reservoir for irrigation, municipal water supply and the generation of 1,000 megawatts of hydroelectricity.
Construction of Tehri Dam
-
Rocks and External materials used – Consequences
- The Tehri dam rocks are 65% clayey and are thus highly fractured and ridden by earthquake fault lines. Such fault lines could be reactivated by the sheer load of the water.
- The swelling of the soil layer can impose a pressure on the rock layers and tend to crack them. Moreover, when the wet soil layers dry they shrink.
- The Tehri dam is built 1.5 km downstream of the confluence of Bhagirathi and the Bhilangana river. The rocks around the river gorge are mainly of the Chandpur phyllite kind.
- The rocks here have undergone various magnitudes of tectonic deformation.
-
Filling the Earth-Rockfill Tehri Dam
- A major input that is required before a dam is built is the permeability (hydraulic conductivity) of rock masses. When there is a wide variation in the permeability dependence on an average value simply will not suffice especially if one knows that collapse takes place at the weakest link.
- The discontinuity apertures in the rocks are the most important factor for the rock’s hydraulic conductivity. The changes in apertures due to stress could have marked effect on the hydraulic conductivity so that one requires in situ tests such as, what is called, Lugeon tests.
- One of the main drawbacks of the Lugeon test is that each test it is limited to an area of only ~ 100 m2 and a height of ~ 10m. In short, site could not be expected to give reliable engineering information.
- The length across the valley at the crest is ~ 575 m while the base width in the upstream-downstream direction is ~ 1000 m at the base and nearly 20 m at the crest. The design requires an impervious core made up of clayey materials and a shell of graded gravel that is topped with blasted rock which should be massive and mostly quartz.
- The fragile nature of the rockfill as compared to the requirement of rocks surface size between 25 mm to 600 mm size or between 1” and 2 ft size.
- The rocks used for rockfills were obtained from Old Dobata area that lies approximately 5 km upstream of dam site on the right bank of Bhagirathi and new Dobata borrows in Tehri Garhwal district.
- The main difference between the New Dobata borrow and the Old Dobata borrow is that the former had nearly 99% quartz and were white in color while that from the Old Dobata borrow had 96% quartz with more garnet and mica. This suggests that the rocks from the old Dobata borrow were more clayish. The old Dobata borrow rocks should not have been used for the top cover.
-
Choice of dam site
- Because of the very nature of the requirements for tall dams on main rivers, geological boundaries such as thrust lines or major faults are not uncommon, since they provide the necessary geomorphologic features. Major fault lines are known to exist at the Tehri dam site.
- Most important requirement these is that the rocks adjacent to the dam or on the sides of the river should be stable to sliding when wet. The slopes of the banks of the river are dominated by Debris or remains of broken rock because of high levels of fracture, and faulting (of the earthquake kind) and sedimentation.
- As discussed above hydro geological reasons such as low grade phyllitic rocks in the abutments and rim slopes with increased soil moisture due to soaking by the increased height of the reservoir could lead to a sliding of bedrocks and cause large landslides. These landslides would increase the sedimentation rate and drastically reduce the dam’s life for power generation or irrigation.
- Because of the high levels of fracture and sandy character the slopes of the hills are expected to be close to the critical angle of 35 degree. The lower regions of the surrounding hills have a slope considerably larger than 35 degree , however.One may therefore expect these slopes to slide and slip, especially if they soaked and wet as when the reservoir is full. If the entire slope was to attain this critical angle , the level of the bottom of the river would rise roughly to 650-660 ft. Flood waters from higher ranges would fill the river up further.
With a view to provide maximum assurance of safety, the dam has been designed adopting most stringent design criteria, incorporating certain features which would ensure its safety, in an unforeseen major seismic event.
(i) A very conservative design slope, with U/S slope of 2.5:1 and D/S slope of 2.0:1, as against relatively steeper slopes in some recent dams built/proposed in region of very high seismicity.
(ii) A very wide crest of 20m, which increases to 25m at its contact with abutments, has been provided.
(iii) A very liberal free board of 9.5m above FRL has been provided to take care of any settlement, slumping due to earthquake and wave action.
(iv) The D/S filter as designed is capable of preventing migration of finest particles (clay flocks) in the event of its cracking and would not permit any piping. A zone of fine (sand) filter has been provided on the U/S face, which in the unlikely event of cracking of core would get washed into cracks and seal them.
(v) The dam shell material is being compacted to unprecedented high density of minimum 2.36 tons/m3 to ensure little settlement, so that no pore pressure is built up during earthquakes.
(vi) The dam embankment is founded directly on bedrock, after removal of all loose, semi‐ compact overburden, thus eliminating possibility of foundation liquifaction during slaking in the event of any earthquake.
(vii) The provision of access galleries at three different levels, on abutments, below dam seat and within the core to enable physical monitoring during operation, would help taking timely measures, through these galleries, in the event of any distress.
Environmental issues
The Tehri Dam has been the object of protests by environmental organizations and local people of the region. In addition to the human rights concerns, the project has spurred concerns about the environmental consequences of locating such a large dam in the fragile ecosystem of the Himalayan foothills. There are further concerns regarding the dam’s geological stability. The Tehri dam is located in the Central Himalayan Seismic Gap, a major geologic fault zone. This region was the site of a 6.8 magnitude earthquake in October 1991, with an epicenter 53 kilometres (33 mi) from the location of the dam. Dam proponents claim that the complex is designed to withstand an earthquake of 8.4 magnitude, but some seismologists say that earthquakes with a magnitude of 8.5 or more could occur in this region. Were such a catastrophe to occur, the potentially resulting dam-break would submerge numerous towns downstream, whose populations total near half a million.
Tehri Hydro Power Complex (2400 MW), comprises the following components:
- Tehri Dam & Hydro Power Plant (1000 MW)
- Koteshwar Hydro Electric Project (400 MW)
- Tehri Pumped Storage Plant (PSP) (1000 MW)
The dam creates a reservoir of 2.6 cubic kilometres (2,100,000 acre•ft) with a surface area of 52 square kilometres (20 sq mt).
Tehri Dam Advantages
- 2400 megawatt electricity.
- Clean Drinking water to almost 40 lakhs of people living in Delhi.
- Clean Drinking water to almost 30 lakhs of people living in and around Uttar Pradesh.
- Less flooding in low lying areas of Uttar Pradesh , West Bengal and Bihar.
- Employment Generation for the local people.
- 12% of the total electricity generated as royalty to Uttarakhand.
- Increase in Tourism sector , Fish Irrigation Projects and other Govt. Projects in Uttarakhand.
- Rs2400 crores profit to the Central Government every year.
- Land Irrigation water to almost 270,000 hectares to Uttarakhand , Uttar Pradesh and New Delhi.
Tehri Dam Issues
The Tehri Dam project has brought concerns about the environmental problems of locating a large dam in the delicate ecosystem of the Himalayan foothills.
There are growing concerns regarding the dam’s stability. Tehri dam is located 7.5kms above the Central Himalayan Seismic Gap, which is a major geologic fault zone. This region was the site of a 6.8 magnitude earthquake in October 1991, with an epicentre 5 km from the location of the dam. Building of the dam will put further pressure on the seismic gap and thus increases the chances of an earthquake.
The Tehri dam is designed to withstand an earthquake of 8.4 magnitude, but some seismologists say that earthquakes with a magnitude of 8.5 or more could occur in this region.
This could result in a dam-break and the flood waters from the dam could submerge numerous towns comming in the way. Tehri dam has been in active protest by environmental organizations and local people of the region.
With a view to provide maximum assurance of safety, the dam has been designed adopting most stringent design criteria, incorporating certain features which would ensure its safety, in an unforeseen major seismic event.
Conclusion:
Tehri Dam Project, a prestigious hydropower cum irrigation project, is the first major attempt to harness vast hydro potential of Bhagirathi river which is fed by Gangotri Glacier. The storage project in the Bhagirathi valley in Uttarakhand Himalaya, envisages impounding of surplus monsoon water of the river for utilizing it in regulated manner for hydropower generation and irrigation
Sources
- https://lookaside.fbsbx.com/file/A_CASE_STUDY_ON_TEHRI_DAM.pdf?token=AWwDmhUqsrA67lV1PsBVF86krLf40Ey7MIBUighHLfGCrq2yEnn1uvTwqMEWS5hSqMXm5OjqrVIqvIjXFfal-OzV9_SFFInu_uF5mxaLFp3RoiJIUL-fktavFxqnTcVY2XUZe4DZmedspcCguJSl-CIk
- http://www.slideshare.net/bobbysir/tehri-dam-its-implications
- http://www.windiaw.com/tehri-dam-uttarakhand-india/
- https://en.wikipedia.org/wiki/Tehri_Dam
PIR PANJAL RAILWAY TUNNEL
PIR PANJAL RAILWAY TUNNEL
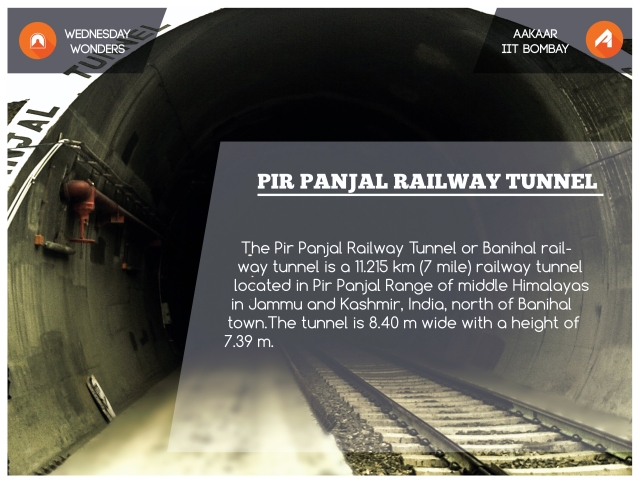
The Pir Panjal Railway tunnel is part of the 202-km Udhampur-Srinagar-Baramulla Rail Link project undertaken by the Northern Railways. It was awarded to IRCON and Konkan Railways for development. The stretch between Quazigund and Dharam – under IRCON’s ambit – was divided into six zones and the contracts of Zone IV and V were awarded to HCC. Zone V consisted of the 10.96-km Pir Panjal tunnel.
Purpose and Benefits of the Indian Tunnel Project
The 11.2km long tunnel was constructed as a part of the Indian Government’s plan to provide Jammu and Kashmir with a reliable link to the rest of the country.
The existing Jawahar Road Tunnel link is inoperable in winter due to heavy snowfall in this region.
The tunnel is part of the 119 km Quazigund to Baramulla railway line which became operational in October 2009. The Pir Panjal tunnel reduced the distance between Quazigund in the north to Banihal in the south to just 11km. It will take about six minutes to cover the distance.
About 1,500 workers were employed in the construction of the tunnel.
Design Specifications and Construction of the Pir Panjal Railway Tunnel
A 3m wide road runs along the track for maintenance and emergency services. The height of the railway tunnel is kept 450m lower than that of the road tunnel so the effect of snow is minimal. There is provision for ventilation, fire fighting and safety monitoring.
The construction of the tunnel was started in November 2005. It was built at a cost of Rs10bn ($201.8m). Construction was undertaken by Hindustan Construction Company under an INR3.9bn contract awarded in 2005. The tunnel was opened in June 2013.
Soil equivalent to one mountain was excavated for the tunnel, using a tunnel excavator, road header and drill and blast methods. It was the first time that a road header was used for excavation in India. About one million cubic metres of excavation was involved in the project. The maximum overburden was 1,100m.
A 780m long access tunnel and a 50m deep shaft were constructed for the construction of the tunnel. These will be used as maintenance access and emergency escapes. Waterproofing was completed for the whole tunnel by February 2011. Day-lighting was achieved in October 2011.
New-age Construction
Hindustan Construction Company (HCC) adopted the New Austrian Tunnelling Method (NATM) where the geological stress from the surrounding rock was used to stabilise the tunnel hole along with the use of the latest 3-D monitoring system. It also adopted the Austrian standard for rock classification system for geotechnical design and determination of rock supports and excavation class.
The alignment of Pir Panjal tunnel comprises soft ground, medium and very hard strata. The Pir Panjal range is dominated by folding, leading to different dipping directions of the strata. Based on the geological investigation, the rocks between the tunnel portions were classified into eight types and the support system was designed accordingly.The excavation area of the main tunnel varies from 67 sq m to 78 sq m based on the rock condition and the final finished cross-sectional area is 48 sq m.
Adits and shafts were provided to shorten the critical length of drive and isolating difficult ground near portals. By providing an adit (south side) and a shaft (north side), the critical length was reduced to 7,600 m, as against the total length of 10.96 km. The total length of the adit is 772 m. The shaft was connected to the main tunnel with a cross passage of 38 m. The cross section of the adit and shaft allows for convenience and ventilation during construction and operation.
The Methodology
The construction methodology adopted in Pir Panjal tunnel could be broadly divided into six parts that involved excavation of top heading along with the support installations; excavation of benching and invert along with the support installations, casting of invert and kicker; fixing of waterproofing membrane and geotextiles, and casting of overt.
The inert excavation is applicable only for rock class V and above. Based on geological requirements, there were three kinds of excavation: tunnel excavation, road header, drill and blast method. In the hard rock strata, the drill and blast method was the best option. The blast holes were drilled in the face with a two-boom hydraulic jumbo (L2C and L2D) and then the explosives were loaded in the drilled holes. The explosives used in the tunnel were power gel, long delay detonators (LDD), non-electric detonators (NEDs), Dcord, and 40- and 32-mm diameter explosives for effective blasting. The NEDs were very useful as loading could take place parallel to other activities.
The concrete work for the tunnel lining was carried out after completion of excavation and primary support works. The lining of the main tunnel was carried out in three stages to a length of 12.5 m (called one block), leaving construction joints behind that are all blocked by water stoppers. Concreting the invert, i.e. bottom portion of the tunnel, was the most challenging part as it leaves no space for the traffic and equipment movement required for carrying out the face activities. A parallel invert bridge was used to enable concrete casting. The concrete cast in the invert is a RCC concrete of M 30 grade. The reinforcement used in the invert is of Fe 500 grade 10 mm diameter.
The invert lining was cast with the help of a concrete pump. Transit mixers were used to convey concrete from the batching plant to the invert under construction.
Compaction and vibration of the concrete were cast in layers in the invert over the reinforcements and manually done by needle vibrators.
The conveying pipe was added or removed as per the requirement. The drain thus left behind was later closed from the top by precast concrete slabs (780 + 600 + 150 mm) separately cast in the casting yard. The kicker casting work was similar to the invert casting work and taken up subsequent to the invert casting.
For the overt lining, RCC lining was carried out in rock class VII and VIII; for the remaining rock classes, PCC lining 300 mm-450 mm thickness was used. In RCC lining, the reinforcement bars of 10 mm and 16 mm diameter were used to prepare the mesh for the overt structure. A separate gantry jumbo was used to manually place, bind and align the steel mesh. The mesh was further reinforced by Pantex lattice girders placed at equal intervals of 1m c/c. The gantry shutters consist of collapsible shutters that need to be realigned after placing them into a newly reinforced block. The gantry is a hydraulic formwork and operable from a single control unit.
For the installation of waterproofing membrane and geotextiles, specialised work was carried out simultaneously across the block. They were installed in the walls of the tunnel to enable the ground water to get channelled through the waterproofing membrane to the perforated PVC pipes. These pipes placed in the corner of the kicker, embedded in the no fine porous concrete, drain out the water collected through the diversion of the waterproofing membrane to the main drainage gutters.
Braving All Odds
The project employed the use of road headers for the first time in India for railway tunnelling. For soft ground terrain, road headers were deployed to work in class IV and above strata. Owing to mixed rock conditions at the tunnel, the optimum cutter speed could not be achieved. The team planned to use the road header to excavate 3.12 km of the 4.22 km, but only 9 percent of the total excavation was achieved using road headers.
During underground excavation, the team unexpectedly came across a heavily populated village barely 20 m above the tunnel alignment. Blasting activity was avoided in the tunnel and to avoid noises of vibration, a major portion was excavated using tunnel excavator or breakers.
During soft ground tunnelling, the project team also encountered heavy ingress of water, wherein water seeped in from all sides at the rate of 70-180 l/sec that ultimately impacted production rate. To tackle this, drainage holes of diameter 114/76 mm with a length of 3 m to 25 m were drilled to drain out the water.
Owing to poor geology and variation in characteristics of rock classes, rocks burst and fell in some locations, demanding additional support and restoration work that caused unforeseen delays. Moreover, 1,500 workers braved the freezing winter from December to March when the temperatures dipped from -3° C to -10° C.
The access area to project sites would often be covered in snow and HCC together with the Border Roads Organisation deployed machines to clear the snow to ensure round-the-clock work. HCC commenced the tunnel excavation in November 2005.
The initial breakthrough of the 2,750 m length tunnel between Banihal and Tethar was achieved on July 2009 and the overall breakthrough between Banihal to Qazigund was achieved in October 2011. The tunnel was recently opened for a trial run in December 2012.
Project Highlights:
- Amongst the longest transportation tunnel in India (11.215 km).
- Provision of 3-m-wide concrete road alongside railway track inside the tunnel throughout the length for maintenance and emergency relief purpose.
- The tunnel passes about 440 m below the existing Jawahar Road Tunnel.
- The alignment of the tunnel crosses the NH-1A at three locations.
- First large-scale use of NATM in India
- Highest overburden: 1,100 m
- Total excavation quantity: 11 lakh cu m
- Execution of rock bolting: 315,000 m
Project details:
- Length: 11.215 km
- Contract value: Rs 391 crore
- Completion: 2012
- Developer: Northern Railways.
Website: http://www.nr.indianrailways.gov.in - Main Contractors: IRCON
Website: http://www.konkanrailway.com - Subcontractor: HCC.
Website: http://www.hccindia.com
Sources:
- http://www.railway-technology.com/news/news59796.html
- https://en.wikipedia.org/wiki/Pir_Panjal_Railway_Tunnel
- http://usbrl.org/aboutus.php
- http://indiatoday.intoday.in/story/indian-railways-pir-panjal-tunnel-kashmir-valley-asia-second-longest-tunnel/1/239901.html
- http://www.slideshare.net/meenakshi1608/kashmir-rail-project
- http://economictimes.indiatimes.com/slideshows/infrastructure/banihal-qazigund-rail-link-through-indias-longest-railway-tunnel/indias-longest-railway-tunnel-through-pir-panjal-mountain-range/slideshow/20793221.cms
- http://www.business-standard.com/article/beyond-business/18-interesting-facts-about-india-railways-business-standard-news-115021600404_1.html
Blog shifted
Hello everyone,
The Akshar blog has been shifted to http://www.civil.iitb.ac.in/cea/aakaar/blog/
Cheers 🙂
Mukul Ghan, Intern at University of Alberta, Edmonton, Canada.
1.Where and how did you get the internship?
My internship was at the University of Alberta, Edmonton, Canada. I was selected through the University of Alberta Research Experience (UARE) Programme
2.How was the interview ? Is there any interesting or valuable point to be shared from your interview ?
The process for selection in the UARE does not involve an interview. What is needed is a Statement of Purpose(SoP) to be submitted at the time of application along with two recommendations and your resume. The recommendation of professors is preferred. Based on the documents submitted you are selected among applicants from all over the world.
3.According to you,which major point in your resume made the university/company to select you ?
I feel the SOP was one of the deciding factors. A research project in Concrete Technology under Professor Prakash Nanthagopalan which I had done during my 2nd year was in my opinion the most attractive point in my resume.
4.How was your work experience?Easy or difficult?
The work experience was moderately difficult. The work mainly involved software coding in MATLAB and a modelling software called MIMICS. The working hours were fixed for civil engineering students. Other discipline students had an option available to work from home.The good thing was you were not expected to work on weekends.
5.According to you, how much important is it to do an internship during 2nd or 3rd year?
All internships provide you with exposure apart from your course curriculum. In course curriculum you get to know “what to do”. During internships you learn the “how to do” aspect of civil engineering. Although, 2nd year internship may help you in the third year internship if you wish to continue in the same profile, 3rd year internship provides you with a better learning opportunity.
6.Was it hectic or were you able to cope up with the stress of working?
Initially the stress wasn’t much. The professor and his team were quite welcoming and understanding of the fact that you are new to the country. Initially they provided with quite simple tasks like literature review and learning softwares. You are allowed to work at your own pace. At a later stage, the professors encourage you to take multiple projects. I was involved in 2 projects. The projects were quite flexible in terms of work schedule. Although, to minimize the workload at the end you must work continuously and the Ph.Ds do ensure that properly.
7.What kind of internships a core enthusiastic student should prefer?
University Internship is a very good option for people who wish to go for higher studies. Also internships involving field work are helpful too. In civil engineering field knowledge is essential to move ahead either during your internship or your job or further studies. Foreign internships provide a flavour of industry which our curriculum fails to do.
8.What was the major difference in doing a project in the institute and doing a project in foreign university ? (if done project in both the places)
Both are good at their own place. Whatever work you do, what ultimately matters is how much you have learnt through it. Anything apart from theory that you do is always an added bonus provided you know the theory very well. An institute project as well as an internship provides you with experience and knowledge.
9.What would you like to say to those students who have less CPI but are willing to do internship in core?
CPI is a good indicator of how a person is but a low CPI should not prove to be a deterrent for your success. CPI is used to screen students for doing internships but not to screen them from learning. Civil Engineering is a vast field and not everyone in the field is a 9 pointer. What you must possess is a will to do work sincerely. Some students may be more interested in field work rather than classroom lectures. You would never know what you like unless you try. Low CPI should not compel you to work in a startup just for the sake of doing an internship. If you wish to work in core there is ample opportunity.
10.After completing the internship,what growth do you see in yourself on an individual basis?
The internship has been a very good experience. It has taught me some professional ethics of work apart from some really amazing softwares.
I have met many amazing people at the University of Alberta who have taught me a lot. A research poster presentation also taught me how to communicate your research to the masses. It was during this presentation I had a newfound respect for all the Masters and PhD students.
Apart from the technical aspect of the internship, a person going to Canada always learns how to respect others and be polite. Staying away from home has also taught me how to cook which is always an added bonus from university internships. It also teaches you the pros and cons of being completely independent and away from family.
11.Any message for the future civil engineers?
People need you!!
12.What qualities do you think are required to get an University/core/non core intern respectively?
University internships require a student to have a flare for research.
Core field internships require a student to do hard work and learn in the field.
Non Core internships mainly require students to have coding ability or an exceptional ability to speak.
13.Anything else you wanna share with us?
The questionnaire was quite self-sufficient I feel. I wish to thank you for giving me an opportunity to write and share my experiences. Thank You very much.
Gurpreet singh, Intern at HKUST.
 INTERN EXTRAVAGANZA : PART-3
GURPREET SINGH, Intern at Hong Kong University of Science and Technology (HKUST)
1.Where and how did you get the internship?
I did my summer internship at Hong Kong University Of Science and Technology (HKUST) under the guidance of Prof. Christopher K. Y. Leung.I got this internship by applying for the International Internship Programme of HKUST (http://www.seng.ust.hk/web/eng/thirdcat.php?samepage=yes&catid=2&subid=12&thirdid=17)
2.How was the interview ? Is there any interesting or valuable point to be shared from your interview ?
Interview was not conducted. I was selected on the basis of my CV/Resume. I had already done a research project in the area of research of my Professor which I think was a very valuable point in my resume.
3.According to you,which major point in your resume made the university/company to select you ?
Generally Professors look at the work which you have undertaken and how that work will be beneficial in the upcoming project which will be offered to you during the internship. CPI or CGPA is also a criteria because it shows your academic excellence.
4.How was your work experience?Easy or difficult?
Work was moderate. I worked around 3-4 hours per day in the lab and spent around 1-2 hours in literature review and analysis of the results. My Professor and Ph.D. guide were very helpful and cooperative.They always helped me with any difficulty that I encountered.
5.According to you, how much important is it to do an internship during 2nd or 3rd year?
2nd year internship helps you to know the basic ideas or knowledge of civil engineering. Till 2nd year you are not even aware of many topics in civil engineering but during 3rd year internship you get to know about your interest and also you acquire a lot of technical knowledge. It is very much advisable to do interns in both 2nd and 3rd year,but the 3rd year internship is the key to set one’s goal in the path ahead.
6.What are the differences between learning as a student and learning as an intern?
During the intern you will be quite passionate about your work because you have to prove yourself there.You have to complete various challenging tasks in the stipulated time period. While as a student, numerous times you won’t be able to do work efficiently because of some other commitments or other course work.
7.Was it hectic or were you able to cope up with the stress of working? What about the ‘deadline pressure’ and ‘accommodation facilities’?
As I had mentioned earlier, my Professor and Ph.D. guide were very helpful,they initially assigned me a work to learn the basics of my project. They basically wanted me to know the goals and significance of my project. Only after getting well acquainted with the task, I was assigned the project. I didn’t feel any stress during my intern.There were no deadline pressures except report submission. But if you make report simultaneously with your work, it will not build any pressure on you. Accommodation arrangements were awesome. They registered me as a student and made ID- card for me by which I was able to assess their college facilities
8.What kind of internships one who is interested in core should prefer?
The kind of internship one should do depends a lot on one’s own interest.Someone with interest in research should seek a University Intern. Company internships are also quite helpful and add immensely to one’s knowledge by giving practical experience.
9.What would you like to say to those students who have less CPI but are willing to do internship in core?
CPI is I would say one of the many criteria of getting a core internship, and not the most important one. It might help you in clearing the first round for shortlist. Essential things that one should possess are the work experience, knowledge, passion and sincerity.
10.After completing the internship,what growth do you see in yourself on an individual basis?
As an individual I became more clear about my future goal. I came to know where exactly my interest lies, or how can I contribute to the society with my work.
11.What qualities do you think are required to get an Univ/core/non core intern respectively?
Qualities vary from company to company or more precisely from the profile of work. If you are applying for a coding profile you should be aware of basic programming languages.For other non core internships, management skills, statistical skills, basic concepts of finance,etc. come in handy. If you are applying for University Internship you should be aware of some softwares like MATLAB, languages like python or C++,etc. These things differentiate you from others. There is no hardcore rule.
12.Anything else you want to share with us?
Yes, it was a very nice experience for me at Hong Kong.The people of Hong Kong were quite helpful and friendly. There are so many places that I had visited. Some of them are The Peak, Ocean Park, Disneyland, Macau, Lan Kwai Fong etc. I faced some problems in terms of food. As a vegetarian it’s quite difficult for you, but for those who are fond of seafood, Hong Kong is a delight. Hong Kong is also a good place for partying and trekking. Overall it was quite an awesome experience.
Utkarsh Agarwal, Intern at NTT Data, Tokyo, Japan.
INTERN EXTRAVAGANZA: PART-2
Civil engineers can excel in fields other than civil also. Here is an outstanding example for that.One of our colleagues, Utkarsh Agarwal did a coding based intern in his 3rd year in Japan and he has shared his experience.

UTKARSH AGARWAL, NTT DATA, Tokyo, Japan.
Question 1: Where did you do your summer internship? How did you get it?
I did my summer intern in NTT Data,Tokyo. I got it through the PT cell. It was a coding based intern and before this intern, I had already done two other interns on the similar grounds.
Question 2: How was the interview ? Is there any interesting or valuable point to be shared from your interview ?
First, I gave a test which contained both technical and aptitude tests. Followed by, two rounds of interviews, one was the technical round and the other being HR. The main thing to keep in mind while giving an interview to a non-english speaking nation’s panel , mine being japanese, is to try to use the most simple english language possible and talk as slowly as possible with clarity in the words. They didn’t ask me a lot of questions, they just focussed on a particular thing and asked many modified questions on the same topic.
Question 3: Which major point in your resume made the company to select you?
My resume was not of a big help to me as the company expected a guy who knows coding. But my previous interns in coding helped me to get shortlisted and from there on, my knowledge and skills on coding helped me clear each and every step of the interview.
Question 4: How was your work experience overall in japan?
It was a pretty good experience for me. The people there in Japan were very good to me. The work they gave me was not difficult at all, it was very easy to do. There were no deadlines imposed on me, but I was given a particular target and I completed it earlier than expected. So, they gave me a new project which was completely new to me and it is a much bigger project. Eventually, I was not able to complete that. Everything was superb, the accommodation they gave me was very good , stipend was more than enough for a normal guy, but I roamed a lot in Tokyo which made me to spend some money from my pockets.
Question 5: According to you, how much important is it to do an internship during 2nd or 3rd year?
If you are clear of your path i.e. if you are sure about core or non-core, then you should start doing the interns from 2nd year in that particular field which will help surely for further interns or placements. If you are not sure, then it is advisable to explore new fields in your 2nd year and decide what you want. I did two interns before this one and I found my interest in coding. So, now I have totally three interns in coding.
Question 6: What are the differences between learning as a student and learning as an intern?
It was a completely new area and a new country for me and I got to know a lot of new things as an intern. I got to know how a company functions and how the people work and even I came to know about the security systems of a big company. I was given a complete project to work on. It helped in increasing my ability to plan and execute things at the right time.
Question 7: What about the deadline pressures ?
There were no deadline pressures at all. I was allowed to work on my own deadlines. There were no pressure or urgency from their side to complete the work
Question 8: What kind of internships one who is interested in core should prefer?
University is the most appropriate if you are going for higher studies. And for civil, going for higher studies is a very good option than going for a job after B.Tech as there is lot to learn in civil which you won’t be able to learn in your B.Tech program.
Question 9: What would you like to say to those students who have less CPI but are willing to do internship in core?
For University intern, the CPI matters a lot. Whereas in the non-core or core interns, it doesn’t matter a lot. As I mentioned earlier, CPI will help you get shortlisted, from there your skills and knowledge only will help you. But it is advisable to maintain a CPI at a decent level always.
Question 10: After completing the internship,what growth do you see in yourself?
I am able to see my goal in my life. I found the field in which I am interested in and I decided to work on this field for lifetime. The three interns in the same field helped me in achieving this and I also came to know about the opportunities for me in and outside India.The opportunities outside India is pretty good for me.
Anything else you wanna share with us?
Yeah. About the Japanese people and country. It is a tough country for the veggie people. It is difficult for them to survive. You have to take food from your home everywhere. It is a beautiful place to visit and there are many things to explore in Japan. People are very nice and helpful. I thoroughly enjoyed my stay in Tokyo
Any advice for juniors?
Don’t get panic if your friends get the interns soon. It doesn’t matter where you work, but how much you learn from your work and how much efforts you put in do that work is the only thing that matters at the end. Sometimes you can learn a lot by working in a startup than working in a well established big company.
